乱码三千 – 分享实用IT技术

乱码三千 – 码出一个新世界


  • 首页

  • 归档

  • 搜索

python连接MySql数据库

发表于 2020-09-11

由于 MySQLdb 模块还不支持 Python3.x,所以 Python3.x 如果想连接MySQL需要安装 pymysql 模块。

pymysql 模块可以通过 pip 安装。但如果你使用的是 pycharm IDE,则可以使用 project python 安装第三方模块。

[File] >> [settings] >> [Project: python] >> [Project Interpreter] >> [Install按钮]

img

由于Python统一了数据库连接的接口,所以 pymysql 和 MySQLdb 在使用方式上是类似的:

1
2
3
4
5
6
7
8
9
10
11
12
13
14
15
16
17
18
19
20
21
22
#创建数据库连接
pymysql.Connect()参数说明
host(str): MySQL服务器地址
port(int): MySQL服务器端口号
user(str): 用户名
passwd(str): 密码
db(str): 数据库名称
charset(str): 连接编码,存在中文的时候,连接需要添加charset='utf8',否则中文显示乱码。

connection对象支持的方法
cursor() 使用该连接创建并返回游标
commit() 提交当前事务,不然无法保存新建或者修改的数据
rollback() 回滚当前事务
close() 关闭连接

cursor对象支持的方法
execute(op) 执行SQL,并返回受影响行数
fetchone() 取得结果集的下一行
fetchmany(size) 获取结果集的下几行
fetchall() 获取结果集中的所有行
rowcount() 返回数据条数或影响行数
close() 关闭游标对象

==================MySQL===================

首先在连接数据库之前,先创建一个交易表,方便测试 pymysql 的功能:

1
2
3
4
5
6
7
8
9
10
11
12
13
DROP TABLE IF EXISTS trade;

CREATE TABLE trade (
id int(4) unsigned NOT NULL AUTO_INCREMENT,
name varchar(6) NOT NULL COMMENT '用户真实姓名',
account varchar(15) NOT NULL COMMENT '银行储蓄账号',
saving decimal(8,2) unsigned NOT NULL DEFAULT '0.00' COMMENT '账户储蓄金额',
expend decimal(8,2) unsigned NOT NULL DEFAULT '0.00' COMMENT '账户支出总计',
income decimal(8,2) unsigned NOT NULL DEFAULT '0.00' COMMENT '账户收入总计',
PRIMARY KEY (id),
UNIQUE KEY name_UNIQUE (name)
) ENGINE=InnoDB AUTO_INCREMENT=2 DEFAULT CHARSET=utf8;
INSERT INTO trade VALUES (1,'乔布斯','18012345678',0.00,0.00,0.00);

==================Python===================

使用Python脚本实现增删改查和事务处理,源码如下:

1
2
3
4
5
6
7
8
9
10
11
12
13
14
15
16
17
18
19
20
21
22
23
24
25
26
27
28
29
30
31
32
33
34
35
36
37
38
39
40
41
42
43
44
45
46
47
48
49
50
51
52
53
54
55
56
57
58
59
60
61
62
63
import pymysql.cursors

# 连接数据库
connect = pymysql.Connect(
host='localhost',
port=3310,
user='woider',
passwd='3243',
db='python',
charset='utf8'
)

# 获取游标
cursor = connect.cursor()

# 插入数据
sql = "INSERT INTO trade (name, account, saving) VALUES ( '%s', '%s', %.2f )"
data = ('雷军', '13512345678', 10000)
cursor.execute(sql % data)
connect.commit()
print('成功插入', cursor.rowcount, '条数据')

# 修改数据
sql = "UPDATE trade SET saving = %.2f WHERE account = '%s' "
data = (8888, '13512345678')
cursor.execute(sql % data)
connect.commit()
print('成功修改', cursor.rowcount, '条数据')

# 查询数据
sql = "SELECT name,saving FROM trade WHERE account = '%s' "
data = ('13512345678',)
cursor.execute(sql % data)
for row in cursor.fetchall():
print("Name:%s\tSaving:%.2f" % row)
print('共查找出', cursor.rowcount, '条数据')

# 删除数据
sql = "DELETE FROM trade WHERE account = '%s' LIMIT %d"
data = ('13512345678', 1)
cursor.execute(sql % data)
connect.commit()
print('成功删除', cursor.rowcount, '条数据')

# 事务处理
sql_1 = "UPDATE trade SET saving = saving + 1000 WHERE account = '18012345678' "
sql_2 = "UPDATE trade SET expend = expend + 1000 WHERE account = '18012345678' "
sql_3 = "UPDATE trade SET income = income + 2000 WHERE account = '18012345678' "

try:
cursor.execute(sql_1) # 储蓄增加1000
cursor.execute(sql_2) # 支出增加1000
cursor.execute(sql_3) # 收入增加2000
except Exception as e:
connect.rollback() # 事务回滚
print('事务处理失败', e)
else:
connect.commit() # 事务提交
print('事务处理成功', cursor.rowcount)

# 关闭连接
cursor.close()
connect.close()[![复制代码](https://common.cnblogs.com/images/copycode.gif)

==================测试结果===================

img

乱码三千 – 点滴积累 ,欢迎来到乱码三千技术博客站

Django博客开发之将文章html内容写入数据库遇到的坑

发表于 2020-09-11

坑1: Python操作mysql数据库出现pymysql.err.ProgrammingError: (1064, “You have an error in your SQL syntax;

下面为python中做mysql数据库插入数据代码操作:

1
2
3
4
5
6
7
8
9
10
11
12
13
14
15
16
17
18
19
20
21
22
import pymysql.cursors

# 循环入库操作
for ll in range(0, len(wallPaperBeanList)):
# 连接MySQL数据库
connection = pymysql.connect(host='127.0.0.1', port=3306, user='ad', password='ad', db='AllThingArePower',
charset='utf8mb4', cursorclass=pymysql.cursors.DictCursor)

# 通过cursor创建游标
cursor = connection.cursor()
insert_sql = "INSERT INTO 'wallpaper' ('category','view_img','img','created_time','img_tag') VALUES ("+ wallPaperBeanList[ll].category +','+wallPaperBeanList[ll].view_img +','+wallPaperBeanList[ll].img +','+wallPaperBeanList[ll].created_time +','+'null' +')'

# print('category==' + wallPaperBeanList[ll].category + ';view_img==' + str(
# wallPaperBeanList[ll].view_img) + ';img==' + str(wallPaperBeanList[ll].img) + ';created_time==' + str(wallPaperBeanList[ll].created_time) + ';img_tag==' + str(wallPaperBeanList[ll].img_tag))
cursor.execute(insert_sql)

# 提交SQL
connection.commit()
# 关闭数据连接
connection.close()

12345678910111213141516171819202122

运行后就出现了下面这个异常,下面贴下完整的异常日志信息:

1
pymysql.err.ProgrammingError: (1064, "You have an error in your SQL syntax; check the manual that corresponds to your MySQL server version for the right syntax to use near ''wallpaper' ('category','view_img','img','created_time','img_tag') VALUES (Origi' at line 1")1

正常文本没有问题 唯独html文本报错,刚开始我一直以为是mysql语法有错误,但找来找去始终没有找到可以改动的地方,百度后网上有博客讲mysql语句拼接的时候里面可能有参数有双引号导致的,使用pymysql.escape_string()方法把有双引号的参数处理一下就行,这个方案没有解决了我的问题,后来找到了一个比较好的解决方案,就是不要用%或者+操作符来拼接SQL语句,应该使用占位符。即execute的第二个参数。

修改后的代码:

1
2
3
4
5
6
7
8
9
10
11
12
13
14
15
16
import pymysql.cursors

# 循环入库操作
for ll in range(0, len(wallPaperBeanList)):
# 连接MySQL数据库
connection = pymysql.connect(host='127.0.0.1', port=3306, user='ad', password='ad', db='AllThingArePower',
charset='utf8mb4', cursorclass=pymysql.cursors.DictCursor)

# 通过cursor创建游标
cursor = connection.cursor()
cursor.execute('insert into wallpaper (category,view_img,img,created_time,img_tag) values (%s,%s,%s,%s,%s)', (str(wallPaperBeanList[ll].category), str(
wallPaperBeanList[ll].view_img),str(wallPaperBeanList[ll].img),str(wallPaperBeanList[ll].created_time),str(wallPaperBeanList[ll].img_tag)))

# 提交SQL
connection.commit()
# 关闭数据连接

坑2: 写入数据库中途出现: Mysql失败,异常pymysql.err.InternalError: (1366, “Incorrect string value: ‘\xF0\x9D\x90\xBF;……

问题描述:

  插入Mysql时失败了,python代码报如下异常:

  pymysql.err.InternalError: (1366, “Incorrect string value: ‘\xF0\x9D\x90\xBF;……

原因分析:

  UTF-8编码有可能是两个、三个、四个字节。Emoji表情是4个字节,而Mysql的utf8编码最多3个字节,所以数据插不进去。

解决方案:

  修改Mysql表的字符集和Pymysql连接库时的字符集。

  1、修改Mysql表的字符集

    说明:将已经建好的表字符集转改成 utf8mb4,排序规则改为 utf8mb4_bin

1
   命令:alter table TABLE_NAME convert to character set utf8mb4 collate utf8mb4_bin; (将TABLE_NAME替换成你的表名)

    注意:排序规则不是 utf8mb4_general_ci,而是utf8mb4_bin,不要想当然

  2、修改数据库连接的字符集   

1
    conn = pymysql.connect(host='localhost', user='root', password='root', port=3306, db='cncb', charset='utf8mb4')

本文为作者原创 转载时请注明出处 谢谢

乱码三千 – 点滴积累 ,欢迎来到乱码三千技术博客站

如何将python采集到的文章保存到wordpress

发表于 2020-09-11

前言

wordpress算是比较流行的博客网站框架, 我本人也一直在使用, 关于python采集文章的上传, 有以下几种方法:

  1. 直接操作数据库
  2. 使用wordpress的rest api
  3. 使用wordpress_xmlrpc第三方模块

其中第三种的体验最为舒适, 对新手友好, 推荐使用

好了 接下来挨个介绍一下这几种方法的使用

直接操作数据库

我们可以使用python的pymysql库进行mysql数据库的直连操作, 具体不过多介绍, 直接上示例代码:

1
2
3
4
5
6
7
8
9
10
11
12
13
14
15
16
17
18
19
20
21
import pymysql.cursors

# 连接数据库
connect = pymysql.Connect(
host='数据库IP',
port=3306,
user='root',
passwd='xxxx',
db='数据库名称',
charset='utf8mb4'
)

# 获取游标
cursor = connect.cursor()

# 插入数据
def insert(post_author, post_date, post_date_gmt,post_content,post_title,post_status,comment_status,ping_status,post_type,menu_order,post_excerpt,to_ping):
cursor.execute('INSERT INTO wp_posts (post_author, post_date, post_date_gmt,post_content,post_title,post_status,comment_status,ping_status,post_type,menu_order,post_excerpt)VALUES ( %d, %s,%s, %s,%s, %s,%s, %s,%s,%s, %s, %s)', (1, post_date, post_date_gmt,post_content,post_title,post_status,comment_status,ping_status,post_type,menu_order,post_excerpt,to_ping))

connect.commit()
print('成功插入', cursor.rowcount, '条数据')

使用wordpress的rest api

关于rest api官方文档如下:

https://developer.wordpress.org/rest-api/

我们先试一下api的威力 格式为:

1
http://{域名}/index.php/wp-json/wp/v2/posts

比如:

1
http://www.jhcms.net/index.php/wp-json/wp/v2/posts

我们能看到几乎大部分文章的信息

那么如何创建一个新文章

我们参考官方文档 https://developer.wordpress.org/rest-api/reference/posts/#create-a-post

得到重要信息如下:

参数

date The date the object was published, in the site’s timezone.
date_gmt The date the object was published, as GMT.
slug An alphanumeric identifier for the object unique to its type.
status A named status for the object. One of: publish, future, draft, pending, private
password A password to protect access to the content and excerpt.
title The title for the object.
content The content for the object.
author The ID for the author of the object.
excerpt The excerpt for the object.
featured_media The ID of the featured media for the object.
comment_status Whether or not comments are open on the object. One of: open, closed
ping_status Whether or not the object can be pinged. One of: open, closed
format The format for the object. One of: standard, aside, chat, gallery, link, image, quote, status, video, audio
meta Meta fields.
sticky Whether or not the object should be treated as sticky.
template The theme file to use to display the object. One of:``
categories The terms assigned to the object in the category taxonomy.
tags The terms assigned to the object in the post_tag taxonomy.

POST /wp/v2/posts 意为要用post方法提交到/wp/v2/posts这个地址

默认是只读api, 要实现提交数据需要安装插件jwt,安装了jwt后可以请求到token了,然后在rest api中传入token信息,系统就不会拒绝你的发布文章的操作了

操作步骤

  1. 第一步 在wordpress管理后台安装 JWT Auth 插件

  2. 第二部 在网站根目录 .htaccess 文件中添加如下内容

    1
    2
    3
    4
    5
    RewriteEngine on
    RewriteCond %{HTTP:Authorization} ^(.*)
    RewriteRule ^(.*) - [E=HTTP_AUTHORIZATION:%1]

    SetEnvIf Authorization "(.*)" HTTP_AUTHORIZATION=$1
  3. 在 wp-config.php 文件中添加如下内容:

    1
    2
    define('JWT_AUTH_SECRET_KEY', 'your-top-secret-key');//随便填写一个密码
    define('JWT_AUTH_CORS_ENABLE', true);
  4. Post请求调用http://{你的域名}/wp-json/jwt-auth/v1/token接口获取token

  5. 根据token进行文章的发布

核心代码如下:

1
2
3
4
5
6
7
8
9
10
11
12
13
14
15
16
17
18
19
20
21
22
23
24
25
26
27
28
29
30
31
32
33
34
35
36
37
38
39
40
41
42
43
44
45
46
47
48
49
50
51
52
53
54
55
56
57
58
59
60
61
62
63
64
65
66
67
68
69
70
71
72
73
74
75
76
77
78
79
80
81
82
83
84
85
86
# -*- coding:utf-8 -*-

import re
import requests
import json
import time
from numpy import *


def get_token():
session = requests.Session()
url = 'http://sex.newban.cn/wp-json/jwt-auth/v1/token'
data = {
'username':"son3g",
'password':"123456"
}
headers = {'user-agent': 'Mozolla/5.0',
}
resp = session.post(url, data=data, headers=headers, timeout=3335) # 请求
r = json.loads(resp.content)
return r


def _do_post( token =''):
session = requests.Session()
url = 'http://sex.newban.cn/wp-json/wp/v2/posts'
data = {
'date': time.strftime('%Y-%m-%d %H:%M:%S', time.localtime()),
'date_gmt': time.strftime('%Y-%m-%d %H:%M:%S', time.gmtime()),
'slug': 'xx',
'status': 'publish',
'password': '',
'title': 'rest api发布post测试',
'content': '系统测试我想我是海冬天的大海',
'author ': '121852835@qq.com',
'excerpt': '',
'featured_media': '0',
'comment_status': 'open',
'ping_status': 'closed',
'format': 'standard',
'meta': [],
'sticky': False, # 置顶
'template': '',
'categories': '1', # 1 未分类
'tags': ''
}
headers = {'user-agent': 'Mozolla/5.0',
'Authorization': 'Bearer ' + token
}
resp = session.post(url, data=data, headers=headers, timeout=3335) # 请求
print (resp.text)
# r = json.loads(resp.content, 'utf-8')

# if r["code"] == 400:
# print r["code"]
# print r["message"]
# print r["data"]
# print r["data"]["status"]
#
#
# # print r["data"]["params"]
# for key in r["data"]["params"]:
# print ("%s=> %s" % (key, r["data"]["params"][key]))
# # print 'resp.text=>' + resp.text
#
# # print time.strftime('%Y-%m-%d %H:%M:%S',time.localtime(time.time()))
# # print time.strftime('%a, %d %b %Y %H:%M:%S GMT+0800 (CST)',time.localtime(time.time())),
# dt = formatdate(None, usegmt=True)
# dt1 = formatdate(None, usegmt=False)
# dt3 = formatdate()
# print(dt)
# print(dt1)
# else:
# print r["code"]
# print r["message"]
# print resp.status_code


if __name__=='__main__':
r = get_token()
print (r)
_do_post(r["data"]['token'])

使用wordpress_xmlrpc第三方模块

操作步骤如下:

  1. 安装wordpress_xmlrpc

    1
    pip install python-wordpress-xmlrpc
  2. 模块引入

    1
    2
    from wordpress_xmlrpc import Client, WordPressPost
    from wordpress_xmlrpc.methods.posts import GetPosts,NewPost
  3. 发布新文章

    1
    2
    3
    4
    5
    6
    7
    8
    9
    10
    11
    12
    13
    14
    def push_article(post_title,post_content_html):
    post = WordPressPost()
    post.title = post_title
    post.slug = post_title
    post.content = post_content_html
    post.terms_names = {
    'post_tag': post_title.split(" "),
    'category': ["itarticle"]
    }
    post.post_status = 'publish'
    wp.call(NewPost(post))

    if __name__ == '__main__':
    push_article("文章标题","文章内容")

    属性介绍:

    • title: 文章标题
    • content: 文章正文
    • post_status: 文章状态,不写默认是草稿,private表示私密的,draft表示草稿,publish表示发布
    • terms_names: 设置文章的标签 tag等
    • slug: 文章别名

完整代码如下:

1
2
3
4
5
6
7
8
9
10
11
12
13
14
15
16
17
18
# -*- coding:utf-8 -*-
from wordpress_xmlrpc import Client, WordPressPost
from wordpress_xmlrpc.methods.posts import GetPosts,NewPost

def push_article(post_title,post_content_html):
post = WordPressPost()
post.title = post_title
post.slug = post_title
post.content = post_content_html
post.terms_names = {
'post_tag': post_title.split(" "),
'category': ["itarticle"]
}
post.post_status = 'publish'
wp.call(NewPost(post))

if __name__ == '__main__':
push_article("文章标题","文章内容")

是不是很简单呢, 如果是批量上传的话, 直接一个循环调用即可

本文为作者原创 转载时请注明出处 谢谢

乱码三千 – 点滴积累 ,欢迎来到乱码三千技术博客站

Django创建数据库常用字段及参数

发表于 2020-09-10

常用字段

1
2
3
4
5
6
7
8
9
10
11
12
13
14
15
16
17
18
19
20
21
22
23
24
25
26
27
28
29
30
31
32
33
34
35
36
37
38
39
40
41
42
43
44
45
46
47
48
49
50
51
52
53
54
55
56
57
58
59
60
61
62
63
64
65
66
1、models.AutoField  自增列= int(11)
  如果没有的话,默认会生成一个名称为 id 的列,如果要显示的自定义一个自增列,必须将给列设置为主键 primary_key=True。
  
  
2、models.CharField  字符串字段
  必须 max_length 参数
  
3、models.BooleanField  布尔类型=tinyint(1)
  不能为空,Blank=True
  
4、models.ComaSeparatedIntegerField  用逗号分割的数字=varchar
  继承CharField,所以必须 max_lenght 参数
  
5、models.DateField  日期类型 date
  对于参数,auto_now =True则每次更新都会更新这个时间;auto_now_add 则只是第一次创建添加,之后的更新不再改变。
  
6、models.DateTimeField  日期类型 datetime
  同DateField的参数
  
7、models.Decimal  十进制小数类型= decimal
  必须指定整数位max_digits和小数位decimal_places
  
8、models.EmailField  字符串类型(正则表达式邮箱)=varchar
  对字符串进行正则表达式
  
9、models.FloatField  浮点类型= double

10、models.IntegerField  整形

11、models.BigIntegerField  长整形
  integer_field_ranges ={
    'SmallIntegerField':(-32768,32767),
    'IntegerField':(-2147483648,2147483647),
    'BigIntegerField':(-9223372036854775808,9223372036854775807),
    'PositiveSmallIntegerField':(0,32767),
    'PositiveIntegerField':(0,2147483647),
  }
  
12、models.IPAddressField  字符串类型(ip4正则表达式)

13、models.GenericIPAddressField  字符串类型(ip4和ip6是可选的)
  参数protocol可以是:both、ipv4、ipv6
  验证时,会根据设置报错
  
14、models.NullBooleanField  允许为空的布尔类型

15、models.PositiveIntegerFiel  正Integer

16、models.PositiveSmallIntegerField  正smallInteger

17、models.SlugField  减号、下划线、字母、数字

18、models.SmallIntegerField  数字
  数据库中的字段有:tinyint、smallint、int、bigint
  
19、models.TextField  字符串=longtext

20、models.TimeField  时间 HH:MM[:ss[.uuuuuu]]

21、models.URLField  字符串,地址正则表达式

22、models.BinaryField  二进制

23、models.ImageField 图片

24、models.FilePathField 文件

常用参数

1
2
3
4
5
6
7
8
9
10
11
12
13
14
15
16
17
18
19
20
21
22
23
24
25
26
27
28
29
30
31
32
33
34
35
36
37
38
39
40
41
42
43
1、null=True
  数据库中字段是否可以为空
  
2、blank=True
  django的Admin中添加数据时是否可允许空值
  
3、primary_key =False
  主键,对AutoField设置主键后,就会代替原来的自增 id 列
  
4、auto_now 和 auto_now_add
  auto_now 自动创建---无论添加或修改,都是当前操作的时间
  auto_now_add 自动创建---永远是创建时的时间
  
5、choices
GENDER_CHOICE =(
(u'M', u'Male'),
(u'F', u'Female'),
)
gender = models.CharField(max_length=2,choices = GENDER_CHOICE) #字段模板展示

6、max_length 最大长度

7、default  默认值

8、verbose_name  Admin中字段的显示名称

9、name|db_column  数据库中的字段名称

10、unique=True  不允许重复

11、db_index =True  数据库索引

12、editable=True  在Admin里是否可编辑

13、error_messages=None  错误提示

14、auto_created=False  自动创建

15、help_text  在Admin中提示帮助信息

16、validators=[] 验证器

17、upload-to 重定义上传文件的路径前缀

本文为作者原创 转载时请注明出处 谢谢

乱码三千 – 点滴积累 ,欢迎来到乱码三千技术博客站

Mac平台下使用Charles进行抓包

发表于 2020-09-08

前言

某天,突然产生了对手机访问进行抓包的想法,google了一下,发现在mac下使用charles进行手机访问的抓包比较容易,就进行了一次手机抓包的尝试(安卓手机)。

这里强调一下 安卓应用抓包建议使用Android7.0以下的模拟器进行操作, 否则HTTPS协议的请求可能存在443无法抓取情况

mac安装charles

对于mac下安装charles,网上教程很多,这里不再进行说明,如果有条件的话,最好进行购买。

charles捕获http请求

1、Proxy – macOS Proxy 先打开代理,使得mac上所有请求都通过charles进行代理。

2、Proxy – Proxy Settings 设置监听端口号为8888。

3、此时,用电脑访问百度,就已经可以获取访问的包了,如果我们需要监听手机的访问,就还得在手机上进行设置。

4、先获取电脑的ip地址,Help – Local Ip Address

5、然后在手机连接wifi,此时手机和电脑连接的必须是同一个wifi,然后在手机设置代理。

6、设置完成后,在手机打开一个网址,此时chartles就可以获取到手机访问的包了。

charles捕获https请求

http的请求我们已经可以获取,但是有些网站是https的,如果我们需要解析https的包,就需要安装证书了。

1、Help – SSL Proxying – install Charles Root Certificate,首先在mac安装CA证书。

2、然后要始终信任该证书。

3、Help – SSL Proxying – Install Charles Root Certificate On …,然后生成手机上的证书。

4、Help – SSL Proxying – Save …,然后保存该证书,它会生成一个类似charles-ssl-proxying.pem的文件,把该文件的后缀改为.crt,然后发送到你的安卓手机,进行安装即可。

5、Proxy – SSL Proxying setting,设置你要监听的https请求的网址

6、手机再访问该网址,即可以抓到https的包了。

APP安装报错解决

1. 如果出现打开时提示:xxx.app已损坏,无法打开,那么输入以下指令解决:

1
sudo xattr -d com.apple.quarantine /Applications/xxx.app

其中xxx.app是出问题的APP名称,如名称中有空格,可用“\”加空格代替

2.如果报错

Charles cannot configure your proxy settings while it is on a read-only volume. Perhaps you are running Charles from the disk image? If so, please copy Charles to the Applications folder and run it again. Otherwise please ensure that Charles is running on a volume that is read-write and try again.

解决办法

1
2
sudo chown -R root "/Applications/Charles.app/Contents/Resources"
sudo chmod -R u+s "/Applications/Charles.app/Contents/Resources"

本文为作者原创 转载时请注明出处 谢谢

乱码三千 – 点滴积累 ,欢迎来到乱码三千技术博客站

Ajax 跨域问题及其解决方案

发表于 2020-09-08

什么是 ajax 跨域

主流的前后端分离模式下,当前端调用后台接口时,由于是在非同一个域下的请求,从而会引发浏览器的自我安全保护机制,最终结果是接口成功请求并响应,但前端不能正常处理该返回数据。

Access-Control-Allow-Origin

因此,当同时满足以下三个条件的情况下,就会出现跨域问题:

  1. 浏览器限制
  2. 非同源请求(跨域)
  3. 发送的是 XHR ( XMLHttpRequest ) 请求

跨域问题

解决方案

想要彻底解决跨域问题,只需要破坏以上三个条件的任一即可:

1. 修改浏览器(不推荐)

添加浏览器启动参数:chrome --disable-web-security,但是极不推荐这种解决方式。

2. JSONP请求(不常用)

Jsonp,全称 JSON with Padding,一种非官方的协议,而是一种约定;前端通过向后台发送 script 类型请求解决跨域,此时接口响应的 application/javascript 类型的数据会作为 callback 函数的参数进行处理。

Jsonp Request

所以,后台也需要做相应的处理。以 Java 为例,添加如下配置即可:

1
2
3
4
5
6
7
8
9
@ControllerAdvice
public class JsonpAdvice extends AbstractJsonpResponseBodyAdvice {

public JsonpAdvice() {
// 前后端约定的jsonp参数名,默认值是callback
super("callback");
}

}

注意,Spring 4.1 版本之后,官方已不再推荐使用上述允许 jsonp 请求的配置,建议使用 CROS 配置来解决跨域问题,详情可查看这里

综上,jsonp 请求存在以下几个弊端:

  1. 服务端需要改动代码进行支持;
  2. 只支持发送 Get 请求,请求头中更改其它类型的请求方式是无效的;
  3. 发送的不是 XHR 请求,而是 script 类型,无法享受到相关的特性。

3. 调用方隐藏跨域

用 Nginx 或 Apache 来代理调用方的请求(客户端变更为相对路径请求,而非绝对路径),此时对于浏览器来说,由于请求是同源的,因此就不存在跨域问题。

4. 被调用方允许跨域(最常用)

  • 服务端配置

以 Java 应用为例,添加如下全局配置:

1
2
3
4
5
6
7
8
9
10
11
12
13
14
@Configuration
public class CorsConfig implements WebMvcConfigurer {

@Override
public void addCorsMappings(CorsRegistry registry) {
registry.addMapping("/**") // 允许跨域的接口
.allowedOrigins("*") // 允许跨域的请求源
.allowedMethods("*") // 允许跨域的请求方式
.allowedHeaders("*") // 允许跨域的请求头
.allowCredentials(true) // 带cookie请求的时候需要开启,且allowedOrigins需要指定为具体的请求源(最好是动态配置)
.maxAge(60 * 60 * 24); // 设定options请求预检命令的缓存时长
}

}

如果只想针对某个类下的接口,或者是某个具体的接口配置允许跨域,只需要在相应的地方添加注解 @CrossOrigin 即可。

  • Nginx 配置

如果配置了 nginx 作为代理服务器,那么只需要为 nginx 添加支持跨域请求即可:

1
2
3
4
5
6
7
8
9
10
11
12
13
14
15
16
17
18
19
20
server {
listen 80;
server_name xxx.com;

location / {
proxy_pass http://localhost:8080/;

# 配置允许跨域
add_header Access-Control-Allow-Origin $http_origin;
add_header Access-Control-Allow-Methods *;
add_header Access-Control-Allow-Headers $http_access_control_request_headers;
add_header Access-Control-Max-Age 3600;
add_header Access-Control-Allow-Credentials true;

# 对于options预检请求,直接响应200
if ($request_method = OPTIONS) {
return 200;
}
}
}

扩展思考

Q1:浏览器在执行跨域请求时,是先执行后判断,还是先判断后执行?
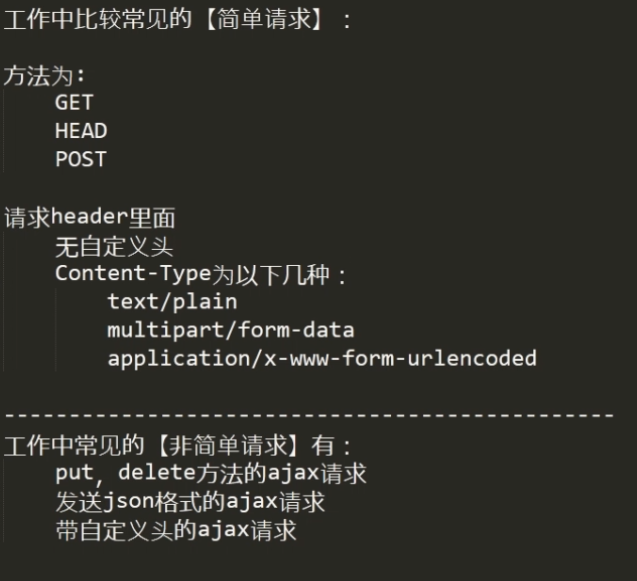
A1:都有可能,这需要根据所发送的请求是简单请求还是非简单请求来判断;如果是非简单请求,浏览器每次在执行真正的请求之前,还会先发送一个 options 请求方式的预检命令【 可设定缓存时长,取消每次请求都要预检,提高效率,参考上面的服务端配置 】。关于两种请求的区分及定义,参考下图说明:

简单请求 VS 非简单请求

Q2:如果是允许带(被调用方) cookie 的跨域请求,此时服务端同样配置为 Access-Control-Allow-Origin 等于 *,前端是否还可以请求成功?
A2:不可以,此时要将 Access-Control-Allow-Origin 指定为调用方具体的域【 可以先取得调用方的域再动态配置,这样就不存在多个域请求的限制问题 】,并且添加配置 Access-Control-Allow-Credentials 为 true。

本文为作者原创 转载时请注明出处 谢谢

乱码三千 – 点滴积累 ,欢迎来到乱码三千技术博客站

向谷歌搜索引擎主动推送网页的教程 Google Indexing API 接口实现

发表于 2020-09-08

谷歌搜索引擎作为全球第一的搜索引擎早就支持了站长主动推送的功能,只不过不是面向普通用户的可视化界面,而是通过编程API接口实现的,有很多站长并不是专业的开发者,但由于谷歌需要验证网站所有权,所以我不能直接做一个可视化界面让站长自己填写自己的秘钥,所以只能对谷歌的接口进行二次封装,以降低使用的难度。

源码项目地址:https://github.com/NeilRen/GoogleIndexing

环境要求

首先,我是以Java为平台进行的封装,JDK版本为1.8,其他程序可能需要中间层才能打通,还不如自己实现,其他编程语言的同学我也没有办法,这个世界上编程语言太多了。

其次,谷歌的Google Indexing API接口在中国大陆无法访问,所以程序需要运行在可以访问谷歌的网络环境中。

前提条件

首先,你需要一个谷歌账号。你的项目是Java的,并且JDK为1.8以上。

创建 Google API 项目

然后在向 Indexing API 发送请求之前,您需要告知 Google 您的客户端并激活对 Indexing API 的访问权限。谷歌为我们提供了一个设置向导,设置向导会引导您在 Google API 控制台中创建项目、启用 Indexing API 以及创建凭据。

首先先跟着向导创建一个项目

Google Indexing API 设置向导

然后转到凭据,添加凭据

Google Indexing API 添加凭证

添加的凭据选择Indexing API、网页服务器(例如 node.js、Tomecat),选择应用数据,点击“我需要哪些凭据?”到下一页

Google Indexing API 为项目添加凭证

创建一个服务账号,名称可以自己起一个名字,秘钥类型选择JSON,点击继续

Google Indexing API 创建服务账号

选择创建无角色账号即可

Google Indexing API 创建无角色账号

这时就会自动下载一个json文件,这个就是我们的私钥,要保存好

Google Indexing API 秘钥

在 Search Console 中验证网站所有权

我们还需要到 Search Console 添加我们的网站,验证所有权,验证成功以后,注意我们要去旧版的控制台,不要去新版的控制台!然后添加所有者

Google 旧版控制台]

所有者的邮箱填写我们上一步获得的私钥JSON文件中的邮箱地址。

Google Indexing API 秘钥JSONGoogle 添加网站所有者

在自己的项目中安装依赖

如果您使用Apache Maven来管理Java项目,只需在项目的pom.xml文件加入相应的依赖项即可。您只需在pom.xml中声明以下依赖:

1
2
3
4
5
<dependency>
<groupId>net.renfei</groupId>
<artifactId>googleindexing</artifactId>
<version>1.0.0</version>
</dependency>

编写代码调用服务,在实例化GoogleIndexing的时候,需要传一个String参数,这个参数是私钥JSON文件所在的文件地址:

1
2
3
4
5
6
7
8
9
10
11
12
13
14
15
16
17
18
19
20
import com.alibaba.fastjson.JSON;
import com.google.api.services.indexing.v3.model.UrlNotificationMetadata;
import net.renfei.googleindexing.GoogleIndexing;
import net.renfei.googleindexing.entity.UrlNotification;
import net.renfei.googleindexing.entity.UrlNotificationType;

public class Demo {
public static void main(String[] args) {
try {
GoogleIndexing googleIndexing = new GoogleIndexing("/Users/renfei/Google/Ren-Fei-5a8df7c2b912.json");
UrlNotification urlNotification = new UrlNotification();
urlNotification.setUrl("https://www.renfei.net");
urlNotification.setType(UrlNotificationType.URL_UPDATED);
UrlNotificationMetadata urlNotificationMetadata = googleIndexing.publish(urlNotification);
System.out.printf(JSON.toJSONString(urlNotificationMetadata));
} catch (Exception ex) {
ex.printStackTrace();
}
}
}

本文为作者原创 转载时请注明出处 谢谢

乱码三千 – 点滴积累 ,欢迎来到乱码三千技术博客站

Hugo博客百度SEO优化 自动提交

发表于 2020-09-08

在切换到Hugo平台之后,比较头疼的是之前hexo很多seo的插件不能使用了. 下面跟大家说一下我的seo优化方案.

Meta标签优化

Description

meta description,被认为是最有用的meta标签,是网站的简介信息。 content控制在100个字符以内比较好。

1
<meta name='description' itemprop="description" content="{{ if .Description }}{{ .Description }}{{ else }}{{if .IsPage}}{{substr .Summary 0 100}}{{ end }}{{ end }}">

Keywords

1
2
3
4
5
{{ if .Keywords }} 
<meta name="keywords" content="{{ delimit .Keywords ", " }}" >
{{else}}
<meta name="keywords" content="{{ delimit .Site.Params.Keywords ", " }}" >
{{ end }}

百度熊掌号推送

说到seo熊掌号是必不可少的了,他可以做到24小时之内收录.所以这个必须不能放过.

gulp

在这里我要使用gulp来做我的自动化任务管理工具

安装gulp需要的模块

1
2
3
4
npm init
npm install gulp --save
npm install xml2js --save
npm install xmlhttprequest --save

在项目根目录创建一个gulpfile.js文件

1
2
3
4
5
6
7
8
9
10
11
12
13
14
15
16
17
18
19
20
21
22
23
24
25
26
27
28
29
30
31
32
33
34
35
36
37
38
39
40
41
42
43
44
45
46
47
48
49
50
51
52
53
54
55
56
57
58
59
60
61
62
63
64
65
66
67
68
69
70
71
72
73
74
75
76
77
78
79
80
81
82
83
84
85
// 导入相关依赖
const gulp = require("gulp");
const fs = require('fs');
const xml2js = require('xml2js')
const parser = new xml2js.Parser();
const XMLHttpRequest = require("xmlhttprequest").XMLHttpRequest;


// 注册百度站长与熊掌号,百度会提供下面的数据给你
var xz_appid = '1623792852327580';
var xz_token = 'bbd1f589b763b7fb40e52628c176ae27';
var baidu_token= '79IKQsDuvZSdXwd9'

//熊掌号每天需要提交的url数量
// 注意这个数字必须要跟百度允许提交的url数量一致,如果多了会提交失败.
const xzCount = 2000


// 创建一个任务
gulp.task('baiduSeo', () => {
// 读取sitemap.xml文件并且转换成json
fs.readFile(__dirname + '/public/sitemap.xml', function(err, data) {
parser.parseString(data, function (err, result) {
// 把读取的数据传入这个函数
urlSubmit(result.urlset.url)
console.log('Done');
});
});
});

// 提交url的方法
function urlSubmit(urls) {
// 最新内容提交
var new_target = "http://data.zz.baidu.com/urls?appid="+xz_appid+"&token="+xz_token+"&type=realtime"

// 历史提交
var history_target = "http://data.zz.baidu.com/urls?appid="+xz_appid+"&token="+xz_token+"&type=batch"

// 百度站长
var baidu_target = "http://data.zz.baidu.com/urls?site=https://zaina.newban.cn&token="+baidu_token

// MIP
var MIP_target = "http://data.zz.baidu.com/urls?site=https://zaina.newban.cn&token="+baidu_token+"&type=mip"

// AMP
var AMP_target = "http://data.zz.baidu.com/urls?site=https://zaina.newban.cn&token="+baidu_token+"&type=amp"

// 最新url,看熊掌号情况而定
urls = urls.map(item=>item.loc[0])
allUrls = urls.join('\n')

var new_urls_Arr = urls.slice(0,xzCount)
new_urls= new_urls_Arr.join('\n');

console.info('百度站长开始提交',new_urls)
sendData(baidu_target,new_urls,'百度站长提交成功')

console.info('熊掌号开始提交')
//sendData(new_target,new_urls,'熊掌号提交完成')

// 提交历史url 每天最多500w条
console.info("历史数据开始提交")
//sendData(history_target,allUrls,"历史数据提交完成")

console.info("MIP 开始提交")
//sendData(MIP_target,allUrls,"MIP提交成功")

console.info("AMP 开始提交")
//sendData(AMP_target,allUrls,"AMP提交成功")

// 提交数据
function sendData(target,urls,message){
var xhr = new XMLHttpRequest();
xhr.open('POST', target, false);
xhr.setRequestHeader('Content-type', 'text/plain');
xhr.onload = function () {
console.log(this.responseText);
if(message){console.info(message)}
};
xhr.send(urls);
}

};

gulp.task("default",gulp.series( 'baiduSeo',function(){}))

配置好以上都文件之后

推送

1
2
3
4
# 博客生成
hugo
# url推送
gulp

本文为作者原创 转载时请注明出处 谢谢

乱码三千 – 点滴积累 ,欢迎来到乱码三千技术博客站

Python的.sort()方法和sorted()比较总结

发表于 2020-09-07

1,.sort()方法

  使用方式是:列表.sort(),作用是将原来的列表正序排序,所以它是对原来的列表进行的操作,不会产生一个新列表,例如:

1
2
3
4
5
6
7
8
9
10
11
12
import  random
numList=[]
print(numList)
for i in range(10):
numList.append(random.randrange(1,10))# 不包括10
print("未排序的列表:",numList)
# numList.sort()执行过程是将列表拍完序后又赋值给了原列表
numList.sort()
print("排序后列表:",numList)
# 无法将numList.sort()赋值给一个新列表,以为它并不返回一个新列表
numList=numList.sort()
print("无法赋值给新列表的的结果:",numList)

执行结果:

1
2
3
未排序的列表: [7, 2, 2, 4, 5, 6, 7, 9, 4, 8]
排序后列表: [2, 2, 4, 4, 5, 6, 7, 7, 8, 9]
无法赋值给新列表的的结果: None

2,sorted(列表),是Python内置函数,该函数对原列表不会产生影响,只是在原来列表的基础上,产生一个有序的新列表,可以复制一个列表名

1
2
3
4
5
6
7
8
9
10
11
import  random
numList=[]
print(numList)
for i in range(10):
numList.append(random.randrange(1,10))# 不包括10
print("未排序的列表:",numList)

sorted(numList)
print("sorted排序后的数组,不会对原列表有任何影响:",numList)
getList=sorted(numList)
print("sorted获得的新的列表:",getList)

执行结果:

1
2
3
未排序的列表: [1, 4, 3, 4, 3, 9, 5, 4, 4, 9]
sorted排序后的数组,不会对原列表有任何影响: [1, 4, 3, 4, 3, 9, 5, 4, 4, 9]
sorted获得的新的列表: [1, 3, 3, 4, 4, 4, 4, 5, 9, 9]

本文为作者原创 转载时请注明出处 谢谢

乱码三千 – 点滴积累 ,欢迎来到乱码三千技术博客站

App自动化之Appium入门

发表于 2020-09-07

像Selenium可以操控Web浏览器,手机APP平台也有类似的自动化测试工具:Appium;
全文分基础介绍、环境搭建和案例演示三部分介绍Appium,以帮助Learner快速的上手。

基础介绍

Appium是一个开源的自动化测试框架,用于原生,混合和移动Web应用程序。 它使用WebDriver协议驱动iOS,Android和Windows应用程序。关于它的运作流程,用图来介绍会更加生动形象一些:

Appium运行流程、原理

在上图中,左边这部分是Appium-Client,通俗点来说,是用于间接驱动最右边的设备执行预定的自动化测试流程,支持使用多种主流的编程语言进行编写,这也是测试开发人员需要关注的核心部分;中间的Appium-Server是衔接左边客户端以及右边APP设备端的重要桥梁,一般仅需要配置好环境及启动运行;右边这块,当然就是实际执行自动化测试的终端,如IOS真机、Android真机,或者是模拟器。

环境搭建

  • NodeJS

Appium是使用nodejs实现的,因此Node是解释器,首先要确认安装好

  • Appium-Server
    • nodejs
    • appium-desktop

上述的两种方式都可以搭建Appium-Server环境,后面演示会基于Appium-Desktop。(PS:下载太慢了?分享个百度网盘)

  • Andrioid SDK
    • android sdk
    • android studio

上述方式可以直接和间接搭建安装Android环境,因为后面要用到adb这个工具,所以需要配置好ANDROID_HOME这个环境变量。(PS:下载太慢了?分享个百度网盘)

  • Appium-Python-Client

后面会用到Python来编写Appium客户端:pip install Appium-Python-Client

okay,准备好以上几个环境后,启动Appium测试一下:

Appium Desktop Server

Appium Desktop Server

案例演示

下面演示在安卓真机上的自动登录Keep(APP)。

  1. 获取设备名称。操作流程:开启手机的开发和调试模式,连接电脑授权认证,Window + R输入并运行cmd,用adb devices -l查看:

获取设备号

  1. 启动Appium Server进行调试:

Inspector Session

Desired Capabilities

从上图可以看到,启动App Session需要有以下几个参数(点击了解更详细的Appium Desired Capabilities):

  • platformName,如Android、iOS等
  • deviceName,参考前面是如何获取的
  • appPackage和appActivity,获取参考这里

综上所述,这里对应Keep的信息如下:

1
2
3
4
5
6
{
"platformName": "Android",
"deviceName": "WAS_AL00",
"appPackage": "com.gotokeep.keep",
"appActivity": "com.gotokeep.keep.splash.SplashActivity"
}

点击Start Session,之后可以看到手机端启动了Keep,并且在Appium Server端中同步展示:

Start Session

Keep

上述的操作通常只是用来方便获取控件id及定位的,下面基于Python编写完整的Appium-Client以实现自动登录操作:

1
2
3
4
5
6
7
8
9
10
11
12
13
14
15
16
17
18
19
20
21
22
23
24
25
26
27
28
29
30
31
32
33
34
35
36
37
38
39
40
41
42
43
44
45
46
47
48
49
50
51
52
from appium import webdriver
from selenium.webdriver.common.by import By
from selenium.webdriver.support.ui import WebDriverWait
from selenium.webdriver.support import expected_conditions as EC

server = 'http://localhost:4723/wd/hub' # Appium Server, 端口默认为4723
desired_capabilities = {
'platformName': 'Android',
'deviceName': 'WAS_AL00', # 需替换成你的deviceName
'appPackage': 'com.gotokeep.keep',
'appActivity': 'com.gotokeep.keep.splash.SplashActivity'
}

driver = webdriver.Remote(server, desired_capabilities)
wait = WebDriverWait(driver, 10) # 最大查找等待超时时间:10s


def get_permission():
"""允许APP获取的某些权限"""

try:
ask = wait.until(EC.presence_of_element_located((By.ID, 'com.android.packageinstaller:id/do_not_ask_checkbox')))
ask.click()
allow = wait.until(
EC.presence_of_element_located((By.ID, 'com.android.packageinstaller:id/permission_allow_button')))
allow.click()
except:
pass


# 允许两项授权
get_permission()
get_permission()

# 点击“立即使用”
welcome = wait.until(EC.presence_of_element_located((By.ID, 'com.gotokeep.keep:id/btn_bottom_in_video_welcome')))
welcome.click()

# 切换“密码登录”(同样可以使用第三方进行授权登录)
driver.tap([(900, 110)])

# 输入“手机号”
phone = driver.find_element_by_accessibility_id('Phone Number In Login')
phone.send_keys('13988888888') # 替换成实际的账号

# 输入“密码”
password = driver.find_element_by_accessibility_id('Password In Login')
password.send_keys('123456') # 替换成实际的密码

# 点击“登录”
login = driver.find_element_by_id('com.gotokeep.keep:id/btn_action')
login.click()

最后,附上运行效果图:

效果图

本文转载自;https://blog.mariojd.cn/get-started-with-appium.html

乱码三千 – 点滴积累 ,欢迎来到乱码三千技术博客站

1…383940…50

乱码三千

android程序员一枚,擅长java,kotlin,python,金融投资,欢迎交流~

491 日志
143 标签
RSS
© 2025 乱码三千
本站总访问量次
由 Hexo 强力驱动
|
主题 — NexT.Muse v5.1.4
0%